The Target defines where and how the new image is created.
The File name field includes the full path and file name for storing the virtual CD on the hard disk. The default name is made up of the Folder for new images as defined on the Virtual CDs page of the Settings program and the CD label or description, as defined on the Analysis page. You can edit this name if desired.
|
The full name must not contain more than 254 characters. |
Generally, the path shown here is selected (white letters on a dark blue background) when this dialog opens. When you type in a name for the file, the entire default name (including path) is replaced by what you type. If you enter a file name without specifying a path, Virtual CD automatically adds the default path (see above) and a file name extension.
Activate the Create a new folder automatically option to have a new folder created for the virtual CD and all its files. Since each virtual CD consists of several files, it can be difficult to tell later which files belong to which virtual CD. For this reason, we recommend leaving this option activated.
The Divide image into several files option is essential if the operating system limits file size to a maximum of 2 GB. This is the case, for example, with the FAT32 file system. Windows NT-based file systems generally use the NTFS file system, which can handle larger files.
|
If there is a chance your images will be used on other media, such as a Smart Virtual CD flash drive, it is important to keep in mind that this other media might use the FAT32 file system, in which case you would not be able to copy the images to that medium. |
The next setting lets you define which type of image is to be created. Create:
| ► | - virtual CD. This is the default setting, and creates a standard virtual CD. |
| ► | - ISO image. Choose this option to create an ISO-compatible image. |
|
ISO images must be stored as a single file; they cannot be divided into multiple separate files. |
|
ISO-compatible images can be created only from media with a single data track (such as a CD-ROM, DVD-ROM, or Blu-ray Disc). For types of CD that cannot be created as ISO images, the option for creating an ISO image is not displayed. |
|
If you choose the option to create an ISO image, a number of options available for virtual CDs are not available for the resulting image. For this reason, we recommend making ISO images only when absolutely necessary, e.g., for compatibility with particular programs. |
If you have virtual CDs that are available on multiple workstations as well as virtual CDs that are available only on one workstation, you can choose to have them divided accordingly in the display:
| ► | Local view: The image is available only on this computer. |
| ► | Global view: The image is available to all workstations that use the same global configuration path. |
| ► | Neither view: The image is not displayed in any Virtual CD program. |
|
This setting defines only where the virtual CD is visible, and not necessarily where it is stored. For example, a virtual CD stored on a UNC path in the network can be assigned to a local view for testing before adding it to the global view. |
|
If you use only virtual CDs in the local view, or only CDs in the global view, this configuration option is not available and the virtual CD is automatically added to the correct view. |
If there is not enough space available for the image, you can try changing the compression settings to make an image that fits at the chosen destination.
The options under Compression include "None" and a choice of four compression levels. The higher the compression level you choose, the longer it takes to create the virtual CD and the more CPU time is taken up when you run the CD. On the other hand, the lower the compression level, the more disk space is required for the resulting image.
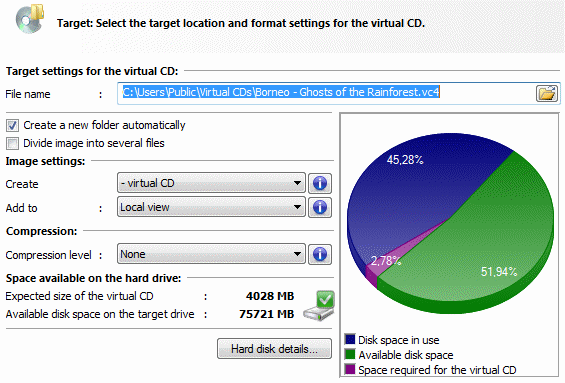
The information under Space available on the hard drive shows you at a glance whether there is enough space available at chosen destination. The pie chart on the right gives you a graphic breakdown of the amounts of space used and available, as well as space required for the new image. Click on Hard disk details... to check the space available on all hard disks.